Understanding The COLDCARD Mk4 Security Model and Secure Element Use

Understanding The COLDCARD Mk4 Security Model and Secure Element Use
By Tristan Borges Solari (guest author)
Using the COLDCARD Mk4 is pretty straightforward. Yet, what goes on under the hood is far from obvious. Technical documentation, the hardware specifications and code used are available, yet not easily understandable by all.
To best understand what’s going on under the hood, we will go through the process of setting up a COLDCARD and using it.
The mechanics involved will be broken down at each step of the process. This way you will have a holistic view of the COLDCARD’s security.
Using Your COLDCARD for the First Time
Fresh from the Factory
Your COLDCARD Mk4 will arrive in a sealed, tamper-evident bag. On it you’ll notice a number, which is unique to every COLDCARD manufactured. There will also be a copy of this number included in the bag.
This same number will appear on the device screen when you turn it on for the first time, since it is recorded into the OTP (One-Time-Programmable) flash memory.
What is OTP Flash?
OTP (One-Time-Programmable) flash is a type of non-volatile memory (info remains even if the device is powered down) that can only be written to a single time. It is used for storing data that should not be modified after it is programmed. Unlike regular flash memory, OTP flash cells do not have the ability to be erased and reprogrammed because the circuit that erases them is not provided.
When an OTP flash cell is manufactured, it is programmed with all-ones and then you can clear some of the bits to zero. However, once a bit is cleared it cannot be set back to one.
Additionally, on this specific chip, an ECC (Error Correction Code) is applied and written adjacent to the cell during programming. The ECC allows for detection and correction of errors that may occur during the write process and prevents further writes to the OTP flash cell. The ECC value and the value itself are locked, making the OTP flash a secure and reliable option for data storage.
Benefits of the Packaging and Bag Number
- Proves that you are the one powering-up the COLDCARD for first time.
- Enforces secure supply chain (not an intercepted package).
- The bag cannot be replaced or resealed.
The goal here is to ensure that no one has intercepted your package and fiddled with it in any way.
Power ON
Once you’ve inspected that the bag in which it came in is intact and that the number written on it matches the copy found inside, you will plug your COLDCARD to a battery using the USB-C connector.
You will then be faced with the bag number. As mentioned above, it’s stored in a secure area of the flash memory at the Coinkite factory and approved by a verifiable cryptographic signature used to identify themselves as the original source of this information.
Now, you may ask yourself, how can I trust this information? First, the bootloader (the computer program that handles starting a computer) will not run the device’s firmware (software that gives the basic instructions for how the hardware should operate and interact with other software running on a device) if it is unsigned or signed incorrectly.
Second, if anything were to be changed at the bootloader or firmware level, the red caution light would turn on, indicating that something went wrong (we’ll get into more detail later).
Securing the Device
If all goes well in the previous step, there’ll be a solid green light on the front of the device. Now that the COLDCARD is up and running, we can proceed to the next step : deciding on your PIN and writing down your anti-phishing words.
The PIN has many roles :
- Access to your device and seed phrase (12/24 words) is protected by your knowledge of the PIN.
- It cannot be brute-forced (only 13 tries).
- Works with anti-phishing words to prevent Trojan devices.
- It’s tightly integrated with the secure elements, and their protection of the seed phrase.
The PIN is made up of two parts, a prefix and a suffix, each being 2 to 6 digits in length. After entering the prefix, two words, known as the anti-phishing words, are generated.
These words are taken from the BIP-39 word list and used as an additional security method to help prevent attacks, like an Evil maid attack, or a Trojan horse, where you think that you’re using your COLDCARD but in fact it’s a fake one used to collect your PIN code.
Once you note them down, you can proceed by entering the second part of your PIN.
Note that if you enter the same prefix on a different, new COLDCARD you won’t be getting the same anti-phishing words since each COLDCARD device has a unique “secret” held within SE1.
Generating your Private Key
Hardware Brief
The main hardware components at play at this step are the secure elements (SE) and the microcontroller.
What is a Secure Element?
Think of it as a safe containing secrets that can work in conjunction with other elements found in your hardware device, if the proper clearances are provided. It can defend the secrets held within it against sophisticated software and hardware attacks. Data processed on a SE is isolated from software found elsewhere in the operating system.
What is a MCU?
The MCU acts like a little brain. But instead of telling your lungs to expand and retract and your heart to beat, it directs other portions of an electronic system.
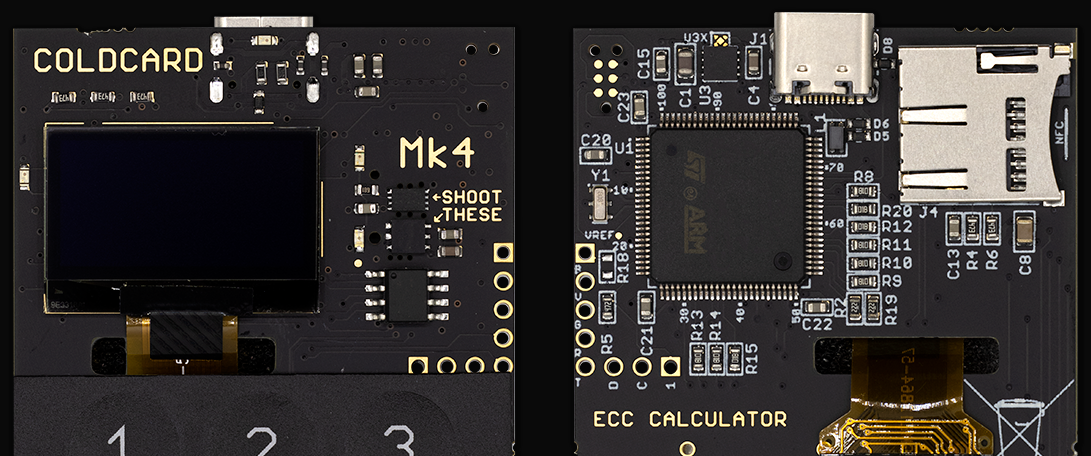
The COLDCARD Mk4, unlike its predecessors and other products like it on the market, has two Secure Elements (SE) : Microchip’s ATECC608B (which we will refer to as SE1) and Maxim’s DS28C36B (referred to as SE2), both designated by the arrows marked with “SHOOT THESE” on the front of the device. On the backside of the device, you will notice the Microcontroller (MCU), the STM32L4S5VIT6, which is the large chip near the top.
The Process
Now that your PIN and anti-phishing words are determined, the COLDCARD Mk4 is ready to generate your private key.
A source of entropy, or randomness, is required to pick your private key. The COLDCARD uses a True Random Number Generator (TRNG), found inside the MCU, to do so.
The entropy used for seed-picking is also seeded by a RNG from both SE1 and SE2. This means that 3 True RNG’s are involved: SE1, SE2 and MCU.
The number obtained is then run through a secure hash algorithm with a digest size of 256 bits, or the SHA-256. The goal here is to remove any bias the TRNG might have. For instance, if the ratio of 0 number bits to 1 number bits is known (e.g. 10% are 0 and 90% are 1), this process will address that and adjust the ratio to 50/50 - we call this “whitening”.
SHA-256 is one of the most widely used and secure hashing algorithms, and is core to Bitcoin, having secured trillions in $USD equivalent in transactions up until now.
You are not required to completely trust this process either. You have the option of using the dice rolls method instead to complement or replace this step.
Each roll of a D6 dice provides 2.585 bits of entropy. By adding 100 dice rolls, you will have the entropy necessary to be secure (you can even verify the math yourself. It’s critical that you do the actual dice rolls for this to work and not fake it.
Once the private key is determined, it is it is encrypted, then stored in SE1 and remains protected by your PIN. The advantage of storing it here is that it is physically separated from the MCU, which isn’t a device designed to withstand physical attacks.
Note that we do not want to trust SE1, which is why we encrypt the private key before storing it. The encryption is done with AES-256-CTR, using a 256-bit key determined by a combination of factors from SE1, SE2 and the main microcontroller.
This means that SE1 alone cannot decrypt the private key. Therefore, we can leverage SE1’s security benefits all the while not exposing sensitive information to it.
The mcu replaceable key is set once a new seed is stored in SE1. This is an additional secret held in the MCU that plays a role in providing a decryption key to gain access to the private key.
The MCU, SE1 and SE2 are needed to decrypt SE1’s copy of the seed, so we can just “quick wipe” by forgetting the MCU part of the key since the actual AES key is still unknown. However, you are limited to 256 wipes of this key.
What is AES-256?
AES-256 is a type of encryption that uses a key with 256 bits (or 32 bytes) of length to encrypt data. It is widely deployed in all commercial crypto systems and many military ones as well. Being a 256-bit key, it is not feasible to brute force (guessing the answer through systematic trial and error).
Used for protecting all web traffic (HTTPS), your bank cards (Visa, MC, Amex) and nearly everything everywhere, you dont need to worry about AES being the weak link.
Remember, we are also using the physical protections of the SE chips (designed to even resist probing by lasers). Central to the design of the Mk4, is that both SE1 and SE2, plus the main micro need to be “fully cracked” to get the seed phrase out of a COLDCARD.
Accessing the Private Key
Let’s say you close your device after setting it up for the first time and now you wish to use it again to sign a Bitcoin transaction. Accessing the private key involves communicating pairing secrets between SE1, SE2 and the MCU.
In other words, they must authenticate themselves to one another to establish an electrical connection between them to further exchange secrets and access the private key.
Each chip holds its own secrets and to reveal them takes some advanced cryptography (HMAC, AES-256 & ECDH):
- MCU : holds the pairing secrets, accessible only by bootloader. Also holds part of the decryption key for SE1.
- SE1 : holds the private key, but it’s encrypted.
- SE2 : knows Trick PINs and part of the decryption key that SE1 needs.
Once valid pairing secrets are shared between the chips, the communication between them is enabled to allow access to the private key.
Here is what the process looks like under the hood :
- You enter a PIN;
- The MCU authenticates itself with SE2 and checks if it’s a Trick PIN (SE2 doesn’t know the true PIN);
- If it’s a Trick PIN, then it is activated;
- The SE1, using the correct PIN, a public key signature and the ECDH setup, will authenticate itself to SE2. This will reveal SE2’s decryption key.
- If it’s an incorrect PIN, a attempt counter is activated (you have a total of 13 login attempts);
- The 3 keys are combined using HMAC(SHA-256) into a single decryption key used to decode the data previously stored in SE1.
- Using both the MCU’s and SE2’s decryption keys, you now gain access to SE1’s decryption key, thus gaining access to the private key.
Other things to note :
- During operation, the main firmware asks for permission to the bootloader to communicate with the secure element.
- The sequence described above implements a data structure that is signed by HMAC generated by the bootloader.
- The bootloader code knows a secret, which it picks and keeps secret behind a hardware firewall held within the MCU.
- Secrets are encrypted using AES-256.
- The hardware firewall protects the bootloader from access from any other code running on the chip, no matter how it got there.
- The chips involved must complete a specific sequence using the pairing secrets, if one bit is off, nothing works.
What are HMAC & ECDH?
- Hash-based message authentication code (HMAC) is an authentication technique that uses cryptography to verify that data is correct and authentic using shared secrets.
- Elliptic-curve Diffie–Hellman (ECDH) is a key establishment protocol using public-private key pairs, suitable for elliptic curve cryptography, where a shared secret can be communicated over an insecure channel.
Tough to Crack
Monitoring the communications channels between SE1 and SE2 and the MCU will not help you. All of their communications (even though only over a few millimetres of copper) are encrypted and authenticated.
The communications protocols between SE1/SE2 and MCU are quite involved, and any single bit error will prevent correct operation. Listening alone will not help you, and interjecting (introducing new hardware or devices into a system) does not help either thanks to ECDH and the encryption done with shared secrets between the devices.
Using a dual secure element model greatly improves the security of the COLDCARD Mk4 :
- They do not share bugs and weaknesses since they are from different vendors.
- Provides dedicated, purpose-built secure storage for your seed words, physically separated from the MCU.
- Controls the LEDs so malicious software can’t change their behavior.
- Removes the possibility of resetting the device due to its heavy involvement in COLDCARD operations.
What if the Secure Elements are Backdoored?
The COLDCARD Mk4 is designed with security in mind, and uses a number of different features to protect your funds even if one or both of the secure elements were to be “backdoored”, which means that it was compromised or tampered with by an attacker.
One of the key features that helps to protect against backdoors is the use of hardware-based security. The secure elements in the COLDCARD Mk4 are physically separate from the microcontroller unit, which is the part of the device that runs the software.
All Bitcoin signing is done in the MCU using the same code (libsecp256k1) as in Bitcoin Core. It’s been reviewed by hundreds of coders, both good and evil. The SE’s hold secrets, but they do not manage your Bitcoin. This is key for protecting from backdoors in those chips, since we cannot review them. Because of the dual SE setup, a backdoor which leaks the secrets would need to exist for all 3 chips.
All communications with the SE’s are done with bootloader code that is set in the Coinkite factory, thus not upgradeable. The signature verification of new firmware is done by the MCU boot code, which isn’t changeable.
It’s worth noting that even the most secure device can be compromised, it’s recommended to follow best practices such as keeping the firmware up to date and regularly checking for suspicious activity.
Overall, the COLDCARD Mk4 is designed to provide a high level of protection for your funds, and it uses multiple layers of security to mitigate potential risks and protect you even if the secure elements were compromised.
Using the Private Key
Now that you have access to the private key, you can use it to approve Bitcoin transactions. Approving or signing Bitcoin transactions can be done offline using a microSD card.
Once you have created a transaction on your wallet software, you then load it onto the microSD card and insert it into the COLDCARD for verification.
To mitigate the risk that malicious software is trying to change the contents of your transaction, the COLDCARD analyzes very carefully the contents of the file.
This includes:
- Verifying that the inputs of the transaction, or UTXO’s (Unspent Transaction Outputs) are valid.
- Verifies that the change going back to your wallet is valid.
What’s with the Hardware?
The hardware used and how it operates in the Mk4 has been discussed extensively in this article. The most crucial parts being the secure elements.
Why are Secure Elements Good?
As mentioned before, MCU chips are not designed for security and built to withstand physical attacks like decapsulating, side-channels attacks, fault injection and more. They are intended for general purposes and focus more on functionality.
A secure element (SE) is a tamper-resistant hardware component that is used to store sensitive information, such as encryption keys and personal identification numbers (PINs), in a secure manner. Some of the key reasons why secure elements are considered to be good include:
- Security: Because the information stored on a secure element is protected by physical and logical security mechanisms, it is extremely difficult for an attacker to extract the information without detection.
- Isolation: The secure environment provided by a secure element ensures that sensitive information is kept separate from the main processing environment of a device, reducing the risk of data breaches caused by software vulnerabilities.
With regards to the ones used in the Mk4, they are essentially fixed function secure elements. This means that all the code is already pre-done in the die of the secure element, so that you can’t change it. You can only fix settings on it.
As mentioned before, the SE doesn’t even see the seed. The (open) MCU does all the Bitcoin operations with the source verifiable code and does the encryption of the seed— also source verifiable — and then puts that encrypted seed inside the secure element.
Why are general-purpose computers not good for bitcoin private keys?
A general-purpose computer is a type of computer that can be used for a variety of tasks, as opposed to being designed for a specific purpose. They typically run a wide range of software programs. Examples include desktop and laptop computers, as well as smartphones and tablets.
General-purpose computers are not well-suited for generating or managing Bitcoin private keys because they are not built specifically for cryptographic operations. Bitcoin private keys are generated using a specific algorithm that requires a high degree of randomness, and general-purpose computers may not be able to provide this level of randomness due to the presence of other software and processes that could affect the key generation process.
Additionally, general-purpose computers are also more susceptible to hacking and malware, which could compromise the security of the private keys stored on them.
Here is an incomplete list of attacks that a general-purpose computer is exposed to.
In contrast, hardware wallets, which are specifically designed for generating and storing private keys, are considered to be much more secure.
Why are Raspberry PI’s not a good security platform?
Raspberry Pi’s are not typically considered to be a good security platform for a few reasons. One issue is their lack of built-in security features, such as hardware-based encryption or secure boot capabilities. Being a general-purpose computer device, it does not have these built-in encryption and other security features to generate private keys and keep them safe. Additionally, Raspberry Pi’s are often used in environments where they may be connected to untrusted networks or devices, making them vulnerable to attack.
There are other important factors that help disqualify the RPi as a device to use for your Bitcoin security. Some are : lack of open documentation for the GPU interfaces (which does the system startup and initial boot loading and is closed source), it hides behind proprietary Broadcom chip, bootloader and drivers, the hardware abstraction layer (HAL) is at the mercy of Raspberry Pi, and has closed binaries from Broadcom.
The device is also not capable of securely attesting firmware signature. A user can download malicious software from a compromised website and the device can’t securely check the signature.
It can be a good device for hobbyists and tinkerers, but the fact remains that it would require an extra effort to secure it and it would not be as secure as a purpose built security device would be.
Oh no! Someone is Trying To Steal My Bitcoin!
This last section will cover additional aspects of the COLDCARD Mk4 security architecture that will help defend your funds from malicious actors.
Trick PINs
Trick PINs, stored in SE2, allow you to enter a PIN code different from the one used to unlock it to deter a potential threat or prevent them from stealing all your funds. They include :
Duress Wallet
Entering this PIN would give you access to a secondary wallet where you can store some funds that you would be willing to lose when faced with a would-be thief. Note that a sophisticated attacker that is able to open the casing of the device and watch the electrical circuits could detect that this is a Trick PIN.
Long Login Delay
When this Trick PIN is entered, a countdown timer is shown and that time must elapse before being able to log in, thus gaining you time during an attack.
Brick Me
After entering this PIN, your device essentially self-destructs, destroying all secrets held within it.
Blank the COLDCARD
This PIN clears the data within the MCU, resetting the device.
Genuine / Caution lights
The green light on the device indicates that the contents of the flash memory have remained unchanged since you last logged in with the correct PIN.
The light is controlled by the secure element and enforced cryptographically. This means that once all the checks between the bootloader and the secure elements are done and are valid, the light will turn green. Else, it’s a sign that your device might be compromised.
Any change to the flash memory of the MCU will also cause the red light to turn on.
Anti-phishing Words
This feature protects you against a compromised COLDCARD that might look like yours but it cannot know the two words generated by your device.
Your PIN prefix is hashed and that answer then goes through a HMAC/SHA-256 operation by SE1. That new answer is then converted into two words from the BIP-39 word list.
There are about 4 million possible word combinations and the bootloader also uses a rate-limiting feature where it would take 2 seconds to test each prefix, so about 93 days to go through all the possible combinations.
Passphrase
The COLDCARD supports BIP39 passphrases, allowing you to create an unlimited amount of extra wallets using your main private key by adding more words or characters to your seed phrase. Learn about it here.
This is the ultimate protection, since even if the COLDCARD did lose its secrets, your funds would be safe without knowledge of the BIP39 passphrase. Similarly, if your backup of your seed phrase was found, the funds cannot be stolen without the passphrase.
The Firmware
The firmware and code used in the COLDCARD are open-source, take a look for yourself here.
What else is that the bootloader will not run the main firmware if it is unsigned or signed incorrectly. This means only Coinkite Inc. can produce firmware that will run on this platform. This means that if someone else were to try to introduce their own code into your COLDCARD, it either won’t work or the red caution light will turn on.
The only policy enforced by the firmware is the PIN attempt timeout periods. The code that does that is in a restricted part of the bootloader and cannot change.
Conclusion
By using this security architecture, you can rest easy knowing that it is currently close to impossible to breach the COLDCARD Mk4. The use of two secure elements and a microcontroller for splitting secrets that are only accessible after going through extensive cryptographic handshakes greatly reduces the device’s attack surface.
Although the secure elements used are closed source, the code that runs on the device isn’t. Even if one of both of the secure elements were to be compromised, however unlikely that may be, your private key remains safe.
If you still don’t have a COLDCARD Mk4, get yours now!
Documentation
- Mk4 Hardware Schematics and Bill of Materials (link)
- Physical Security Notes (link)
- COLDCARD PIN Design and Operation (link)
- Mk4 Dual Secure Elements (link)
- COLDCARD Firmware (link)
- COLDCARD Mk4 Security Model (link)
- About 128 & 256 bit Encryption (link)
- AES 256 Encryption Algorithm (link)
- HMAC (link)
Follow Coinkite and Coldcard on Twitter to stay up to date with their products!
For further inquiries or to connect with the author, reach out to them on Twitter at @TristanBorgess